Why Source-Control?
When working on sufficiently-large projects, it's good to be able to keep track of changes with a source-control system (sometimes referred to as "revision control system" or "version-control system" or VCS. Personally I prefer the old term "source-control"). The advantages of using such a system:
- Keeping track of changes:
Know who made the changes and when.
Record changes with appropriate comments ("..hmmm.. why did I make this change..?"). - Reverting and obtaining previous versions.
- Managing versions and labels of your code in various history points.
- Potentially sharing the project with other developers ,working together making tracked changes.
- Some source-control systems allow tracking bugs and tasks, while associating them to changes made in files.
Many enterprises use commercial source-control systems. Since the majority of my enterprise projects have been on Microsoft environments, in the early days I was using Visual Source Safe (VSS), in later years it's been Team Foundation Server (TFS). Both consist of a source server and client applications which integrate with the Windows domain users and with Visual Studio IDE.
On home projects I prefer to use a more modest source control system, preferably one which I can store online for backups and doesn't require a server running all the time.
Article level: Reasonably moderate
Table of Contents
Since this is quite an extensive post, I decided to include a table of contents.
- Particles of a Source-Control System
- Download List
- VCS for Cheap Bastards: Free Open-Source Solutions
- The Sky is not the Limit: Store It in the Cloud
- Breakdown of the Procedure
- Getting Started: Create the Repository Locally
- Moving It to the Cloud: Getting Started with Assembla
- Improved User Experience
- Use Your Repository Like a Boss: Take It into Visual Studio!
Particles of a Source-Control System
Usually on a source-control system the project's code resides in a database on central server (commonly referred to as the "repository"). Clients can connect to the server and retrieve the project's code files from it.
Once a file is retrieved and changed, it's marked as a pending change ("checked-out" in Microsoft's slang). The change can be committed to the repository on the server ("check-in"). In this process the source control system also logs which user committed the change, and attaches an optional relevant comment by that user. Changes in multiple files can be bundled in a single submission (Microsoft calls this a "changeset").
Once the change is submitted to the server, other users can (and should) get up-to-date with the latest version of the changed files.
In most source-control systems, client-side management is integrated into the IDE one way or another.
Some systems (e.g. Microsoft's Visual Source Safe) allow only a single user make changes in a specific file at a time, while others (like Microsoft Team Foundation Server) allow multiple users to make changes concurrently.
Each file's history of changes it kept on the server, thus it can be reverted to any of its previous states. Additional common features usually include the ability to mark all the files in the project with a label (e.g. "Code version 1.3") at some given point in time, thus versions of the entire project can be managed and retrieved. Another option is to duplicate the entire project into a separate directory, thus creating 2 versions which can evolve in different directions. This action is called fork (Microsoft calls it "branch"). Separate forked branches can also be re-merged into one another (surprisingly Microsoft also calls this action "merge").
Download List
Quick link list to the downloads mentioned in this post:- TortoiseSVN, A Subversion Windows Explorer integration.
- Slik SVN, A full command line support of Subversion client and server tools.
- Syncro SVN Client, A commercial Windows UI Subversion client.
- Vercue, A free/paid Windows UI Subversion client.
- Visual SVN, A commercial Visual Studio Subversion integrated client.
- AnkhSVN, A free Visual Studio Subversion integrated client.
- WinMerge, My favourite free code diff tool.
VCS for Cheap Bastards: Free Open-Source Solutions
Git, Mercurial, Bazaar and Subversion (a.k.a SVN, by Apache) are 4 commonly used open-source solutions, each consists of a source-control proprietary repository schema, an API and several compatible tools (clients and server implementations, IDE and desktop integration etc). Some of those tools are free and some commercially paid. They all also support remote usage over HTTP based on well-documented REST services, thus they can be stored online.
Git and Subversion seem to be the most commonly used repository types. There are many more, which can be seen and compared in this Wikipedia article.
My choice: Subversion
After a short and painful trial with Mercurial and a short shallow glance at Git, I came to the conclusion that Subversion is the more user-friendly of the four options and decided to go with it (thus I won't be writing much about the other solutions).The Sky is not the Limit: Store It in the Cloud
Why store your code online?
- It makes sharing it among developers easy.
- You don't need to run your own VCS repository server.
- It's always accessible.
- Easy to connect to your code from more than one machine.
- It's a reliable backup for your code with all its changes
Where?
Well, the answer to that question partially depends on how private you need your project's code to be; Whether you are working on a private project which should be restricted and secured, or you are working on an open-source project and you have no problem sharing it with the rest of the world.
Other factors are the size of your project, the number of individual users who will be working on it, whether you require additional features (like task/bug tracking) and, of course, how cheap a bastard you are.
There are quite a few websites that offer (some free and some paid) storage of source-control repositories. Many of them are compatible with at least one of the 4 source-control systems listed above.
Here are a few examples I've collected. I marked in yellow the services which provide free storage and keep your code private at the same time:
| Where? | Free Storage? | Supported Repositories | Your Code Is.. |
| Assembla | Yes (Up to 1 GB) | Git, Subversion | private |
| beanstalk | No | Git, Subversion |
private
|
| BerliOS | Yes (Unlimited) |
Git, Subversion, Mercurial, CVS
|
open-source
|
| bitbucket | Yes (Unlimited) | Git, Mercurial | private |
| codesion | Yes (Up to 100 MB) | Git, Subverion | open-source |
| CodePlex | Yes (Unlimited) |
Git, Mercurial, Subversion
|
open-source |
| Code Spaces | No |
Git, Subverion
|
private
|
| dynamsoft | No | TFS |
private
|
| freepository | Yes |
Subversion
|
private
|
| github | Yes (Unlimited) | Git | open-source |
| Google Code Hosting |
Yes (Unlimited)
|
Git, Mercurial, Subversion | open-source |
| JavaForge | Yes (Unlimited) |
Git, Mercurial, Subversion
|
open-source
|
| Kiln | Not really | Mercurial |
private
|
| launchpad | Yes (Unlimited) | Bazaar | open-source |
| ProjectLocker | Yes (Up to 300 MB) | Git, Subverion |
private
|
| RiouxSVN | Yes (Up to 50 MB) | Subverion |
private
|
| SourceForge | Yes (Unlimited) | Subversion | open-source |
| Slik SVN | Yes (Up to 100 MB) | Subversion |
private
|
| unfuddle | Yes (Up to 200 MB) | Git, Mercurial |
private
|
| XP-Dev.com | No |
Git, Mercurial, Subversion
|
private
|
My choice: Assembla
After reviewing the above options, and a couple more, my clear winner was Assembla:- Free, up to 1 GB.
- Keeping my project private.
- Supporting Subversion repositories (and Git, but I am willing to forgive them for that).
- Gets extra points for containing the word Ass in its name.
Breakdown of the Procedure
The process which I'm going to provide here consists of a number of steps. Perhaps not all of them are necessary for you, but I give them fully in order to give a good explanation of how Subversion works locally as well as online:
- The starting point: I have my local code in a local standalone folder.
- Create an empty local Subversion repository in a local folder.
- Copy my code from my local standalone folder into the newly created repository.
- Get code from the local repository to an empty folder, which will now be a working code folder associated with the local repository.
- Create a dump of the local repository in an archived file.
- Create an online Subversion hosting account.
- Upload the archived repository to the online hosting service.
- Get code from the online repository to an empty local folder. This folder will now be a working code folder associated with the online repository.
Getting Started: Create the Repository Locally
Now that I have chosen my source control implementation type (Subversion, i.e. SVN) and where to store it (Assembla), I need to create an SVN repository of my code.
Install preliminary tools
In order to start working with SVN and produce the repository, the basic binaries need to be installed.
The most common basic implementation is TortoiseSVN. It provides a set of client utilities, including Windows Explorer integration.
There are more user friendly client tools (will talk about those a bit later), but for having the initial essential binaries, this is a good start.
This is all nice and good, but unfortunately TortoiseSVN does not cover the entire range of Subversion client and server tools. A good addition would be a full support of SVN command line tools. There are many implementations for that too. One of which is Slik SVN (which also provides free SVN hosting service, as listed above), and that's the one I'll be using here.
Create a separate repository folder (server)
To get started working in a source-control mode, we now need to split our code location in 2: We need a folder to contain an SVN managed repository database (server), and a work folder where where we can retrieve versions of the files and submit changes to them (client).
The first step is to define an empty folder as a repository folder.
Right-click the designated folder and on the context-menu select TortoiseSVN Create repository here.
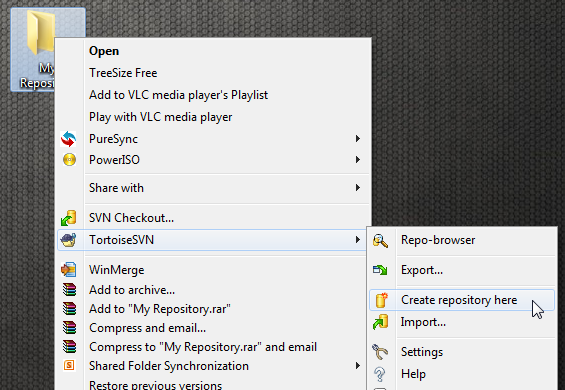
If all goes well (and, seriously, if it doesn't at this stage, we need to talk..), TortoiseSVN will add what it needs to make this folder into a kosher repository (currently an empty one), and it even gives a notification about that. For the moment we'll leave it at that and hit OK.
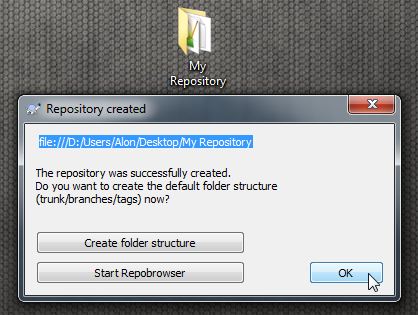
This folder now acts as our Subversion repository server.
Move your code to the repository
Now to import some code to the empty repository. Doing that is as easy as right-clicking the code's folder and selecting TortoiseSVN Import...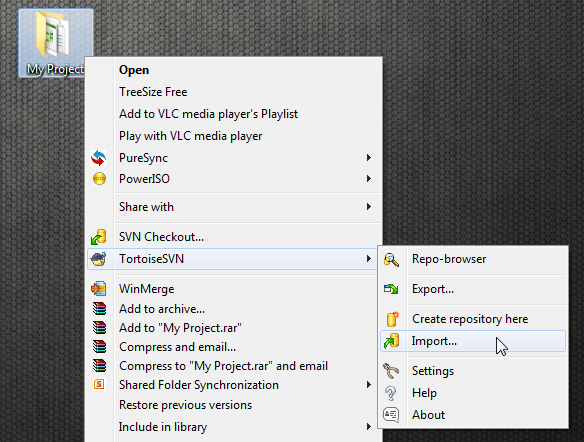
Select the location of the repository. This can be a URL of an online Subversion repository, or (in our case, for now), a local folder repository.
Note: This should be a valid URI. Notice the "file:///..." prefix. It's necessary. If you're not sure, just click the "browse" ("...") button next to the textbox and select the repository folder through the UI.
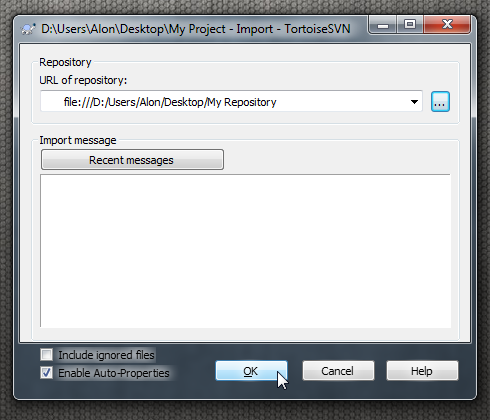
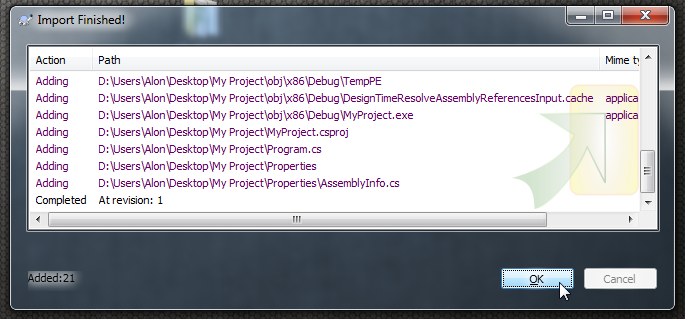
Files are transferred to the repository.
Congratulations! Your code in its current state is as of now revision #1.
Note that binary files (built executables in bin and obj folders) were also transferred to the repository. It's usually uncommon practice to include them in the repository (which normally holds just the unbuilt project). We'll handle this later.
Create a working folder (client)
Hurray! Now we have a copy of our code in a SVN repository database (in a local folder). This repository folder acts as a source or server from which the code can be retrieved, and to which changes can be submitted (by one or more clients).
One important thing to note is that the 2 folders (the repository folder, and the folder from which the code was imported) are not connected at the moment at all. That is, there is no Subversion client-server relation between them. Now it's time to establish this relation.
Actually, a good practice at this stage is to start with an empty folder, and let Subversion manage its content.
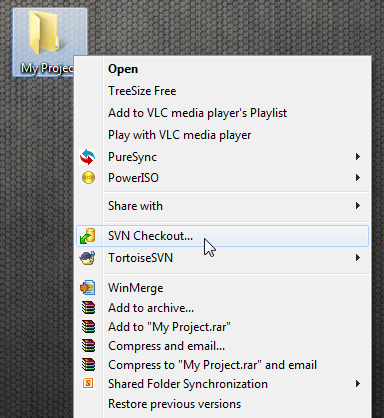
To do that, right-click the designated working folder, select SVN Checkout... (notice that this is not the same term as what Microsoft calls "check-out"! With Microsoft's source-control products, "check out" means open the file locally on the client for editing. Here we mean creating a working code folder).
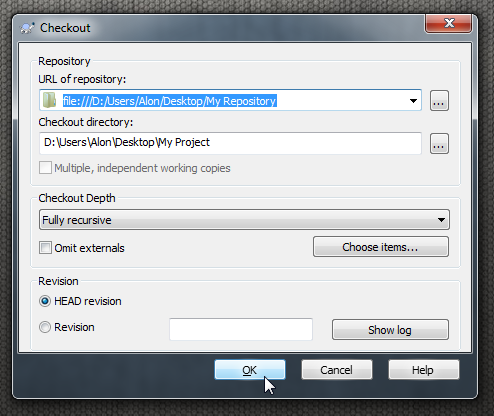
Now choose the repository location. Again, this can be an online URL of an SVN repository, or the local folder, and again this should be a valid URI. Notice the "file:///..." prefix. It's necessary. If you're not sure, just click the "browse" ("...") button next to the textbox and select the repository folder.
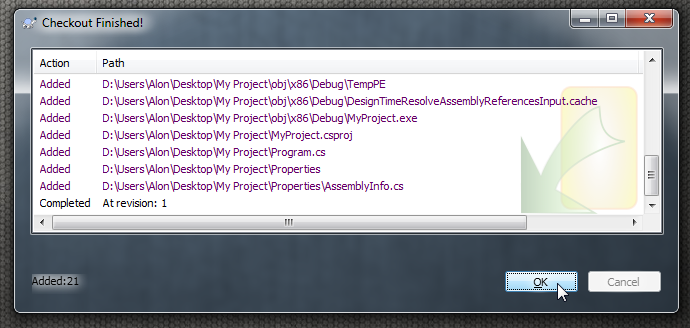
The work folder is constructed with files from the repository.
Now the working folder contains the project's code and marked with an icon to show it's connected to the local SVN source control.

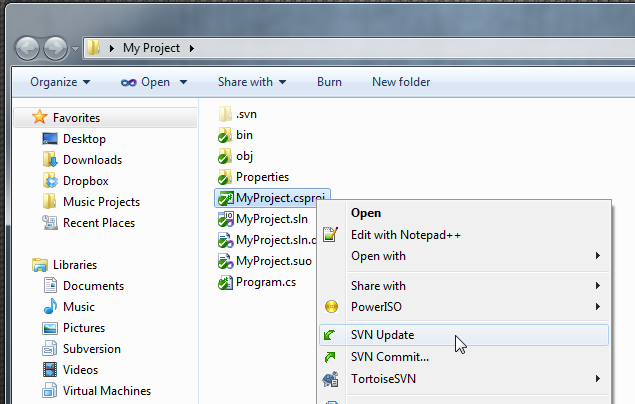
The files in the working folder are also marked with proper icons reflecting their SVN source control status. Also note the .svn folder which contains revision information.
It's now also possible to directly perform source control actions like "Update" (get the latest version of the file from the repository) or "Commit" (submit changes in the file to the repository).
Don't keep unnecessary binaries in your repository!
It's good practice to keep everything you need for your project to build in the repository. It's uncommon to keep the built outputs, which are created in the Bin and Obj folders.
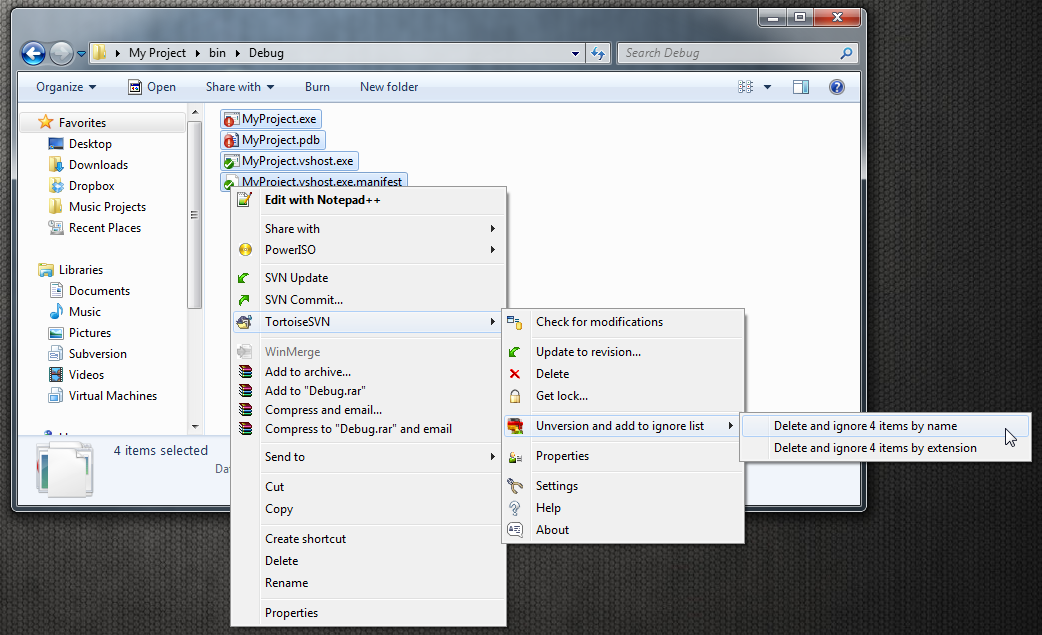
If Subversion adds your binary outputs to the repository, you can easily remove them and set Subversion to ignore them in the future. This can be done by name or extension, at the folder level or at the files level.
All you have to do is right-click the items you wish to remove and ignore, and select:
TortoiseSVN Unversion and add to ignore list Delete and ignore items by name (or by extension).
Moving It to the Cloud: Getting Started with Assembla
It's time to discard the local repository and upload it to the cloud. Most of the steps are pretty self-explanatory, but I'll provide a quick screenshot-illustrated walkthrough with some important commentary.
Create a dump of your local repository
To make it easy to move your entire repository (that includes the project sources, history of tracked changes etc), it's possible to dump it into a backup file first.
This is done with Subversion's command line tool named
svnadmin dump REPOS_PATHIn order to dump the data into a file, a command line redirection is used by providing the > symbol followed by a full path to the file. Here's an example:
svnadmin.exe dump "D:\Users\Alon\Desktop\My Repository" >"c:\MyRepository.bak"Set up your SVN hosting space
Go to Assembla, create an account, confirm it by email and log in (if don't know how to do that, we really need to talk).
Under "My Start" you should "Create your own space". This space will host your repository, so pay attention on the following steps.
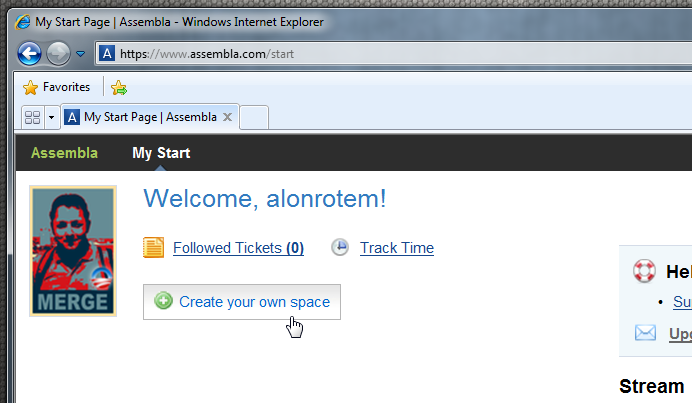
You have the option to create a private project or a public open-source project. The choice is up to you. Since my project is private, I get started with the private option.

On the next step you'll be asked to select the repository type and features. The free options are down there, just scroll down and expand them. There's also a Git option, but I'll pass this time, thank you.
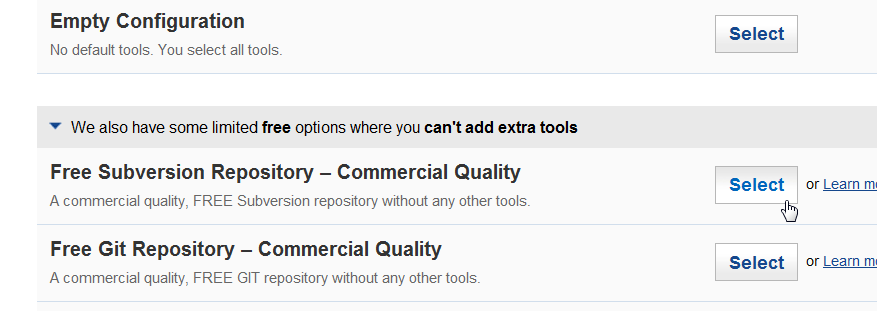
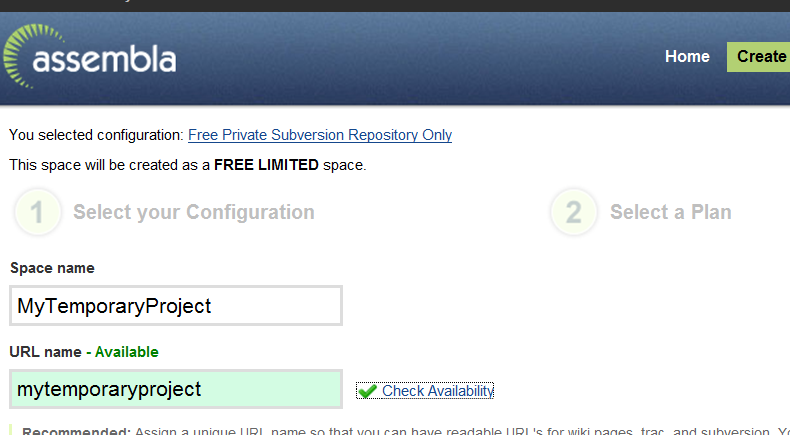
Next you'll be asked to specify a name for your repository. This is important because this name will be (by default) used in your repository's URL.
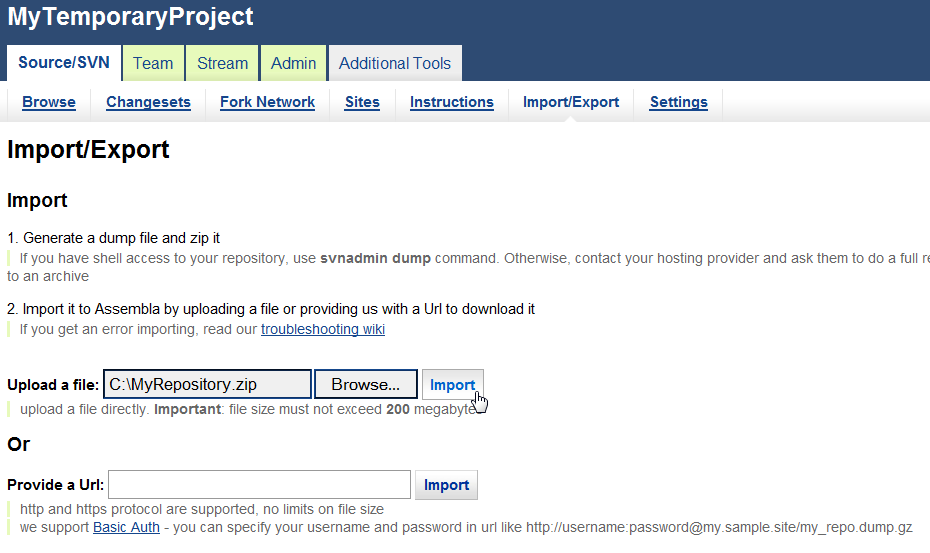
Once you have the repository space created, you can go to the Import/Export section and upload the archived repository created as explained above.
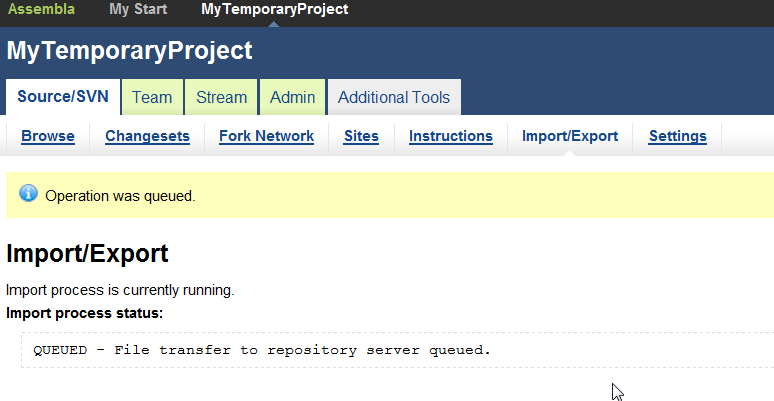
Importing...
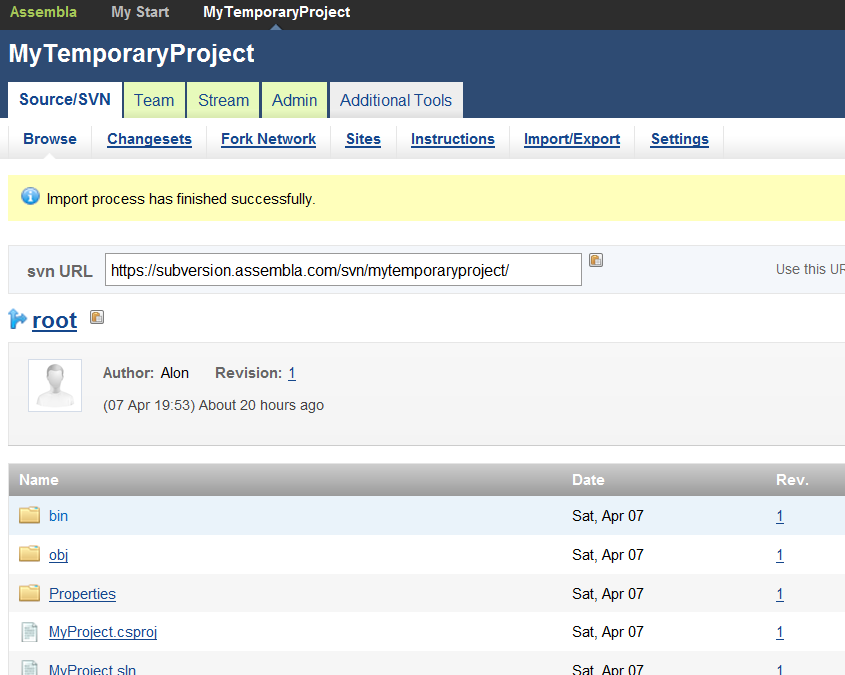
Once the import is complete, your repository is online. The repository folder we've been working with until now can be discarded, and the clients should be working with the online repository instead.
Note the svn URL field below- this is to be used by Subversion clients from now on.
Create a working folder (client)
In order to work with a client on the online repository, we need to create a working folder, just like we did with the local repository.
The first step is similar: Right click the folder and select SVN Checkout...
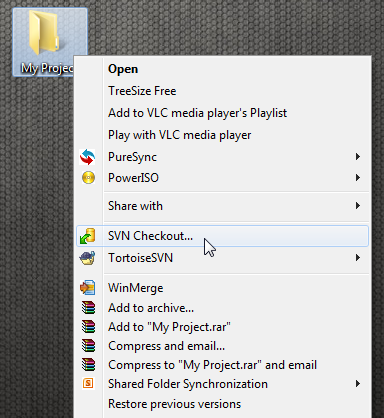
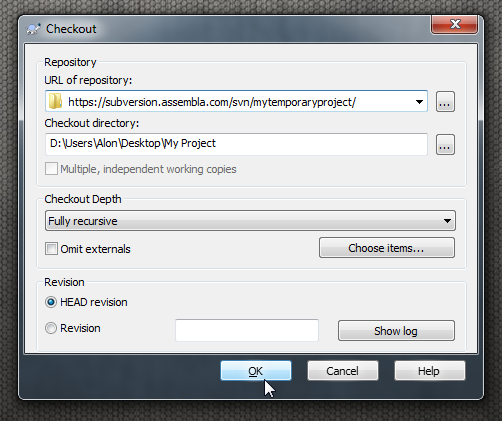
The next step is also similar, just that we're using the URL of our online repository, instead or a local folder URI:
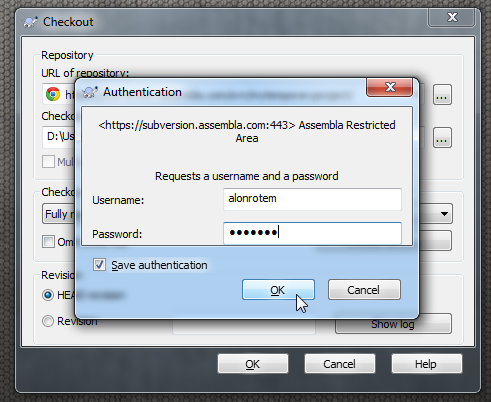
Since the online repository is on a secure account, we'll have to provide credentials to access it:
The result is the same, but now our local working folder is connected to an online repository.
The local repository folder can now be discarded.
Improved User Experience
TortoiseSVN (in Windows Exploerer) and Slik SVN (via the command line) provide all the tools I need now to manage my code. It's easy to update a file, submit changes and perform any action on my Subversion repository, both locally and online.
However, in terms of user experience, the situation is far below par. Luckily there are many client solutions. Again, some are paid and some are free open-source. Here is a Wikipedia article with a comprehensive list of Subversion clients. I have tested a few of those solutions, and I'll list here the 2 which made the best impression so far.
Important note: Know the version of your repository!
One important note when it comes to Subversion repositories: Subversion is being developed by Apache and keeps evolving as a product. There are differences between repositories of version 1.6 and version 1.7.4, and not every tool supports every version. When working with TortoiseSVN or Slik SVN and when creating your repository online or offline, it's good to know which version of Subversion you are working with.
When installing client tools, be sure they support your repository version.
Commercial tool: Syncro SVN Client
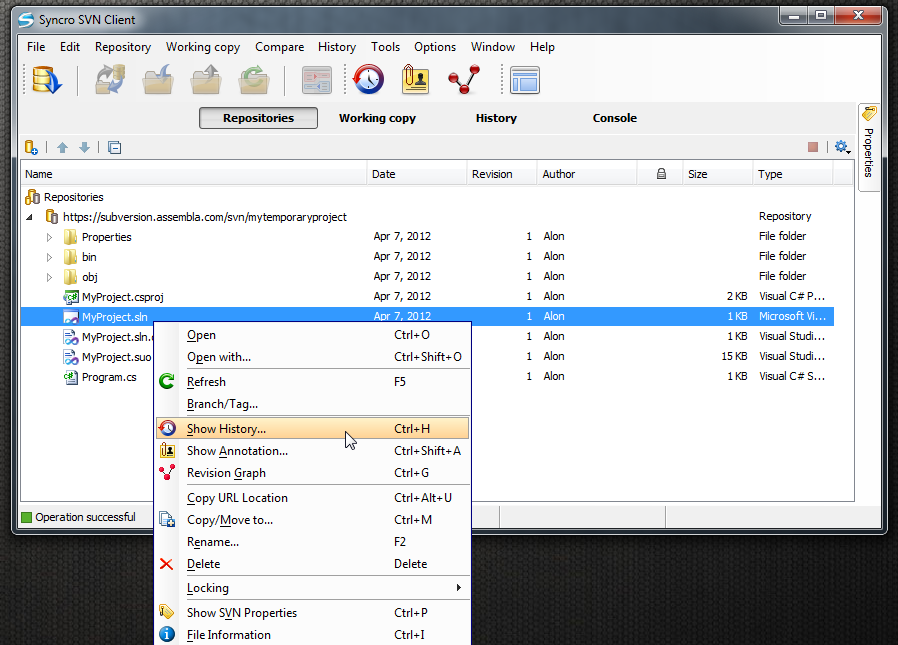
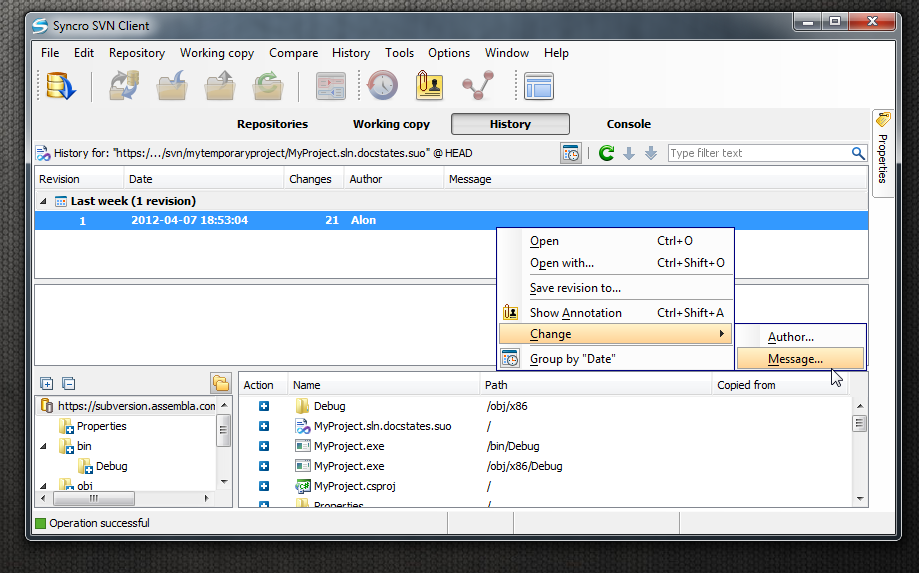
Syncro SVN Client is a very nice client Subversion application. It's has a very intuitive and easy to use user interface. It allows management of multiple repositories, both online and offline and supports all the main features of Subversion.
I have tested version 7.2, which was the latest version at the time this post was written, and at the moment the supported Subversion version is 1.6. Thus, for example, it failed to detect my working copy folder with Subversion 1.7.4 as being under source control.
Syncro SVN is a paid commercial tool with a number of license options.
However, in every other aspect, Syncro SVN is a very appealing client tool.
Free tool with a paid option: Vercue
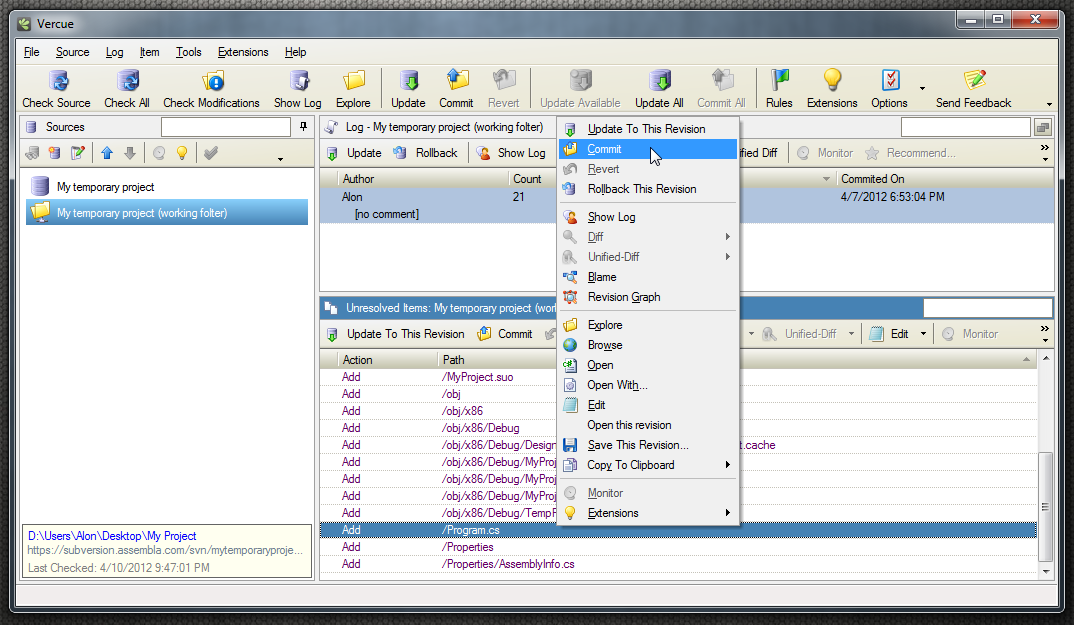
Yes, it's true Vercue has a paid professional version too with extra features, but on a small scale I tried the free version and was very satisfied with it.
Vercue supports Subversion 1.7.4 (the latest), works fluently with my online and offline repositories. Good intuitive user interface, and everything a Subversion user needs in one place.
For the sake of full disclosure, I must add that the fact that it was developed by a fellow Israeli (although I do not know him) adds a bit to my personal pride and will to promote it. In any case- good work, Adrian!
Use Your Repository Like a Boss: Take It into Visual Studio!
In case you are, like me, working with Visual Studio, going back and forth to an external client application is a bit uncomfortable. Integrating Subversion directly into Visual Studio improves the work experience tremendously. With a good tool at hand, you don't have to leave your development environment at all!
My choice: AnkhSVN
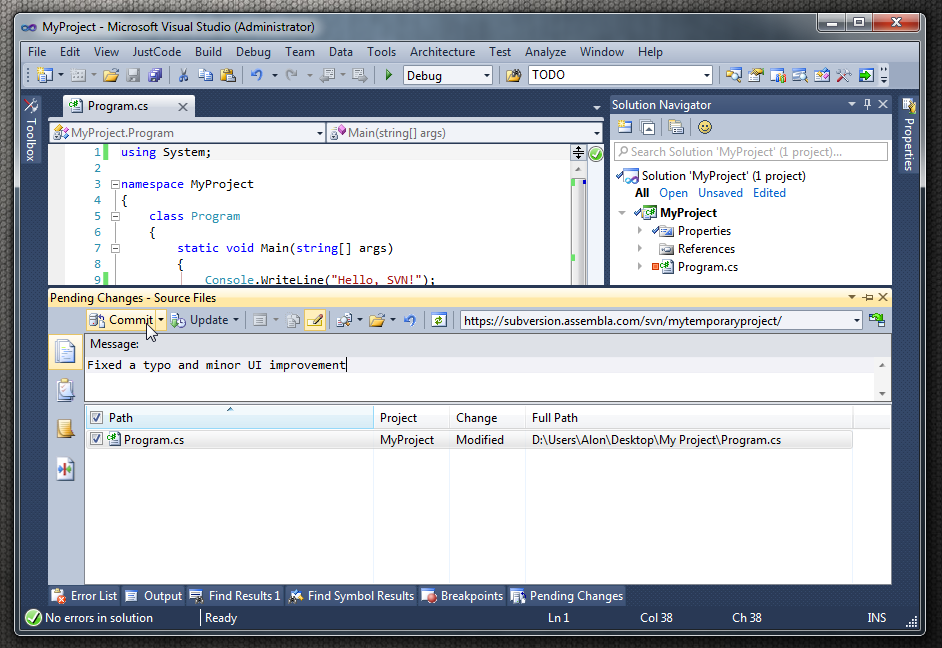
There are 2 leading extensions for Visual Studio: The paid Visual SVN and the free (and awesome!) AnkhSVN. I have tried both, and I am very impressed with AnkhSVN.
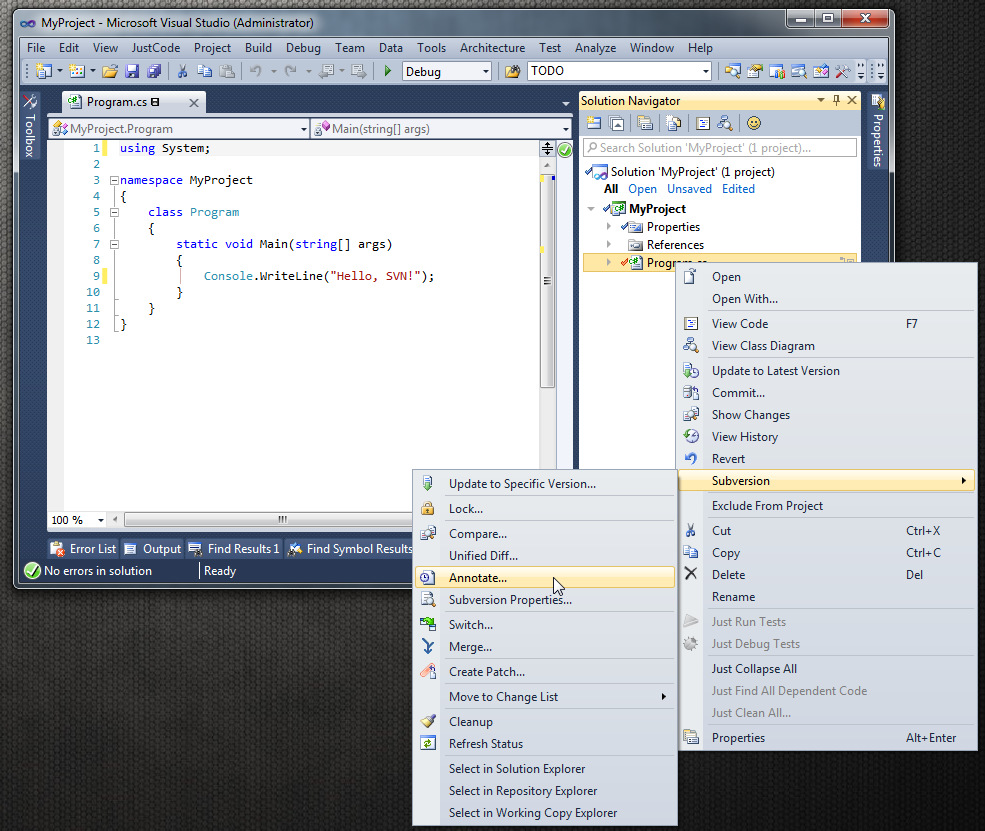
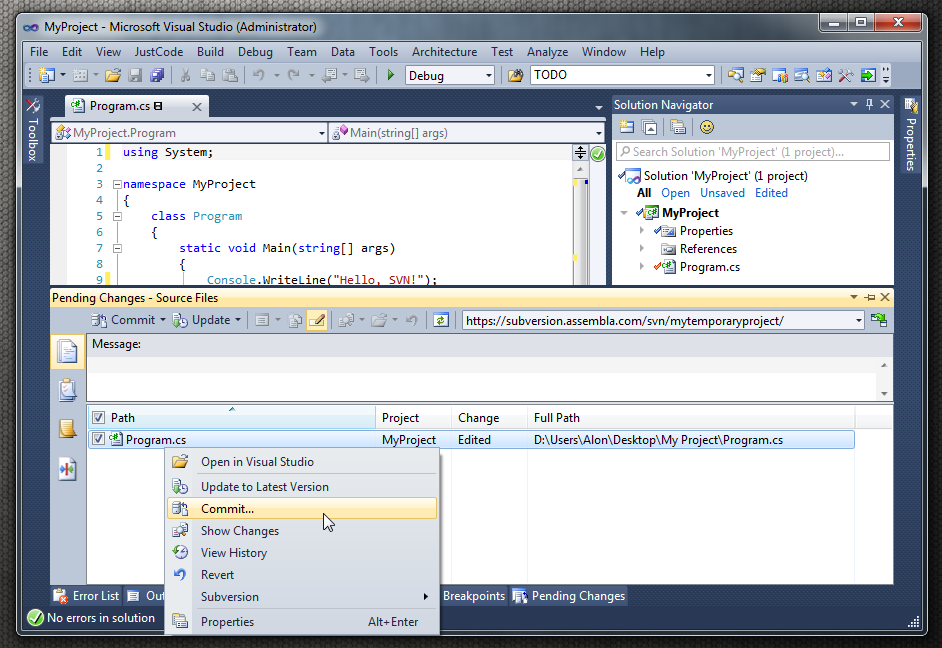
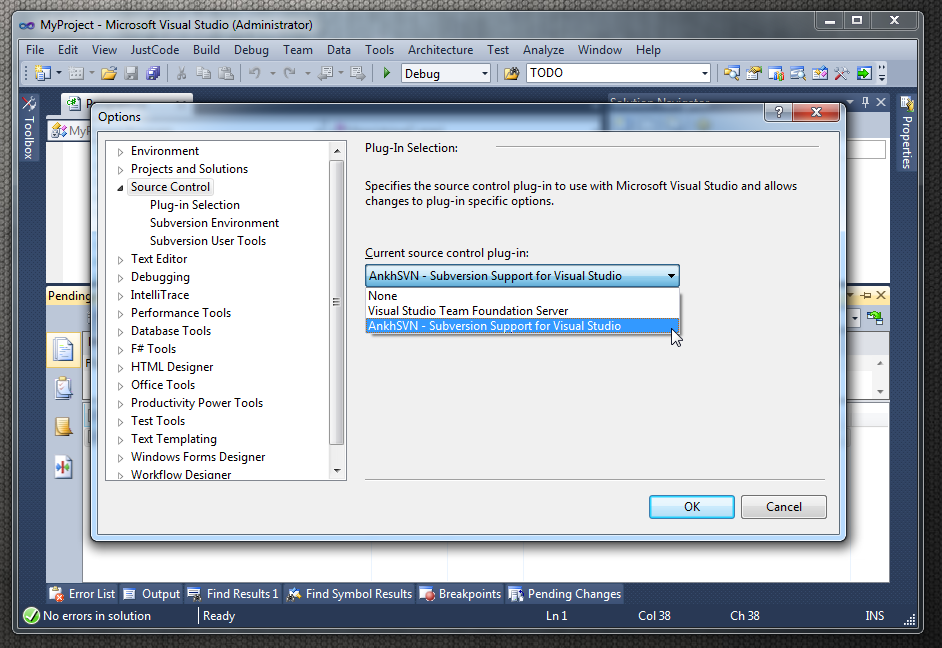
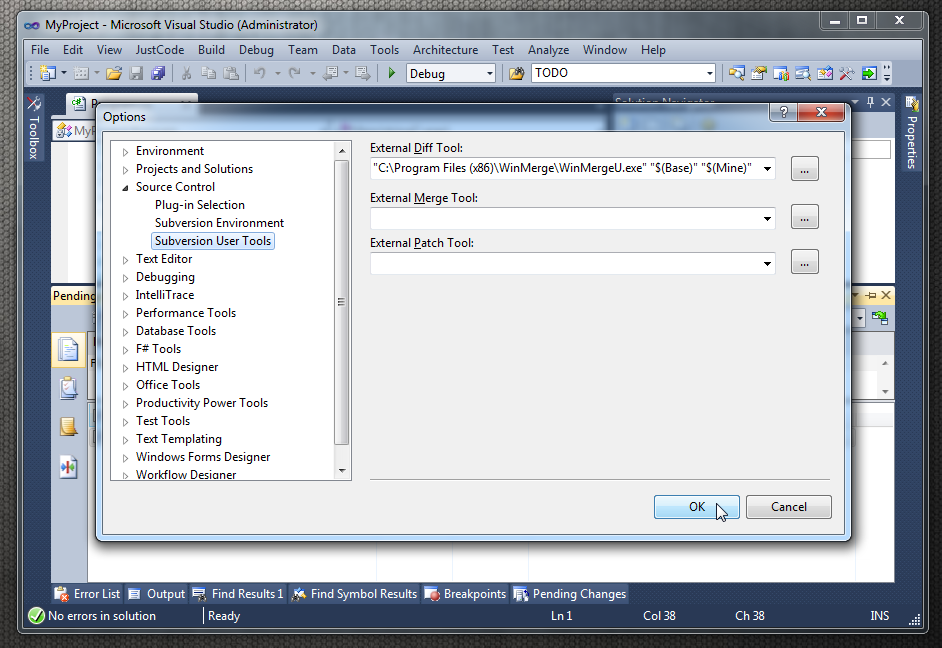
AnkhSVN has gone quite a way from being a Visual Studio extension to a full-blown Source-Control plugin working directly from within the IDE. If you've worked with VSS or TFS, working with AnkhSVN would be as easy as cake. Many of the features you're used to are already there just where you'd expect them to be.
Here are a few appetizing screenshots:
Working side-by-side with TFS: Set your solution's source control
You may want to open your Subversion-controlled solution in a place where TFS is used (e.g. in your workplace). It's possible to explicitly set your project to know it's under Subversion control (thus automatically load with AnkhSVN and not with the default TFS).
To do this:
Open your Subversion-AnkhSVN-controlled solution in Visual Studio.
In Visual Studio's main menu go to File Subversion Change Source Control...
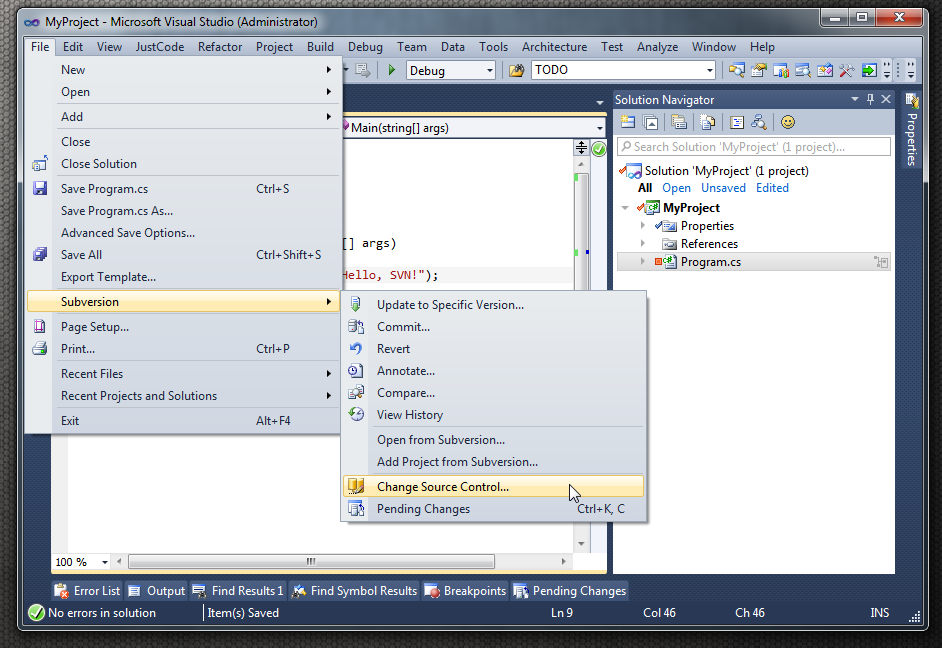
In the dialog that pops up, select each of the lines (one for the solution, and one for every project), click the Connect button to make the Connected box checked.
Then click OK to confirm.
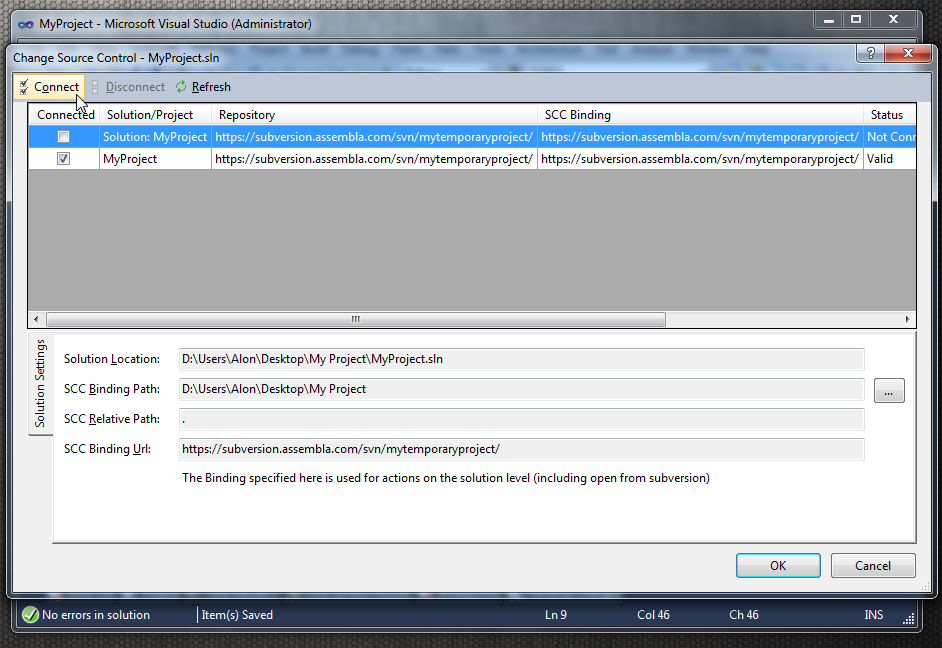
Once this is done and your solution is saved, whenever you open your solution, even if you do it in an environment where TFS is the default source control plugin, AnkhSVN will take over.
Other solutions will be opened regularly to work with TFS.
Behind the scenes:
This action adds a few lines in the .sln file and in its .csproj files which relate them to the right source-control.
Those lines can also be added manually (although, why?).
Here is an example of what's added to an .sln file:
# Visual Studio 2010
Project("{FAE04EC0-301F-11D3-BF4B-00C04F79EFBC}") = "MyProject", "MyProject.csproj", "{1B12BC2A-4E44-4556-9370-7205C94AD5FE}"
EndProject
Global
Svn-Managed = True
Manager = AnkhSVN - Subversion Support for Visual Studio
EndGlobalSection
Debug|x86 = Debug|x86
Release|x86 = Release|x86
EndGlobalSection
GlobalSection(ProjectConfigurationPlatforms) = postSolution
{1B12BC2A-4E44-4556-9370-7205C94AD5FE}.Debug|x86.ActiveCfg = Debug|x86
{1B12BC2A-4E44-4556-9370-7205C94AD5FE}.Debug|x86.Build.0 = Debug|x86
{1B12BC2A-4E44-4556-9370-7205C94AD5FE}.Release|x86.ActiveCfg = Release|x86
{1B12BC2A-4E44-4556-9370-7205C94AD5FE}.Release|x86.Build.0 = Release|x86
EndGlobalSection
GlobalSection(SolutionProperties) = preSolution
HideSolutionNode = FALSE
EndGlobalSection
EndGlobal
Here is an example of what's added to an .csproj file:
<Project ToolsVersion="4.0" DefaultTargets="Build" xmlns="http://schemas.microsoft.com/developer/msbuild/2003">
<PropertyGroup>
<Configuration Condition=" '$(Configuration)' == '' ">Debug</Configuration>
<Platform Condition=" '$(Platform)' == '' ">x86</Platform>
<ProductVersion>8.0.30703</ProductVersion>
<SchemaVersion>2.0</SchemaVersion>
<ProjectGuid>{1B12BC2A-4E44-4556-9370-7205C94AD5FE}</ProjectGuid>
<OutputType>Exe</OutputType>
<AppDesignerFolder>Properties</AppDesignerFolder>
<RootNamespace>MyProject</RootNamespace>
<AssemblyName>MyProject</AssemblyName>
<TargetFrameworkVersion>v4.0</TargetFrameworkVersion>
<TargetFrameworkProfile>Client</TargetFrameworkProfile>
<FileAlignment>512</FileAlignment>
<SccLocalPath>Svn</SccLocalPath>
<SccAuxPath>Svn</SccAuxPath>
<SccProvider>SubversionScc</SccProvider>
<PropertyGroup Condition=" '$(Configuration)|$(Platform)' == 'Debug|x86' ">
<PlatformTarget>x86</PlatformTarget>
<DebugSymbols>true</DebugSymbols>
<DebugType>full</DebugType>
<Optimize>false</Optimize>
<OutputPath>bin\Debug\</OutputPath>
<DefineConstants>DEBUG;TRACE</DefineConstants>
<ErrorReport>prompt</ErrorReport>
<WarningLevel>4</WarningLevel>
</PropertyGroup>
<PropertyGroup Condition=" '$(Configuration)|$(Platform)' == 'Release|x86' ">
<PlatformTarget>x86</PlatformTarget>
<DebugType>pdbonly</DebugType>
<Optimize>true</Optimize>
<OutputPath>bin\Release\</OutputPath>
<DefineConstants>TRACE</DefineConstants>
<ErrorReport>prompt</ErrorReport>
<WarningLevel>4</WarningLevel>
</PropertyGroup>
<ItemGroup>
<Reference Include="System" />
<Reference Include="System.Core" />
<Reference Include="System.Xml.Linq" />
<Reference Include="System.Data.DataSetExtensions" />
<Reference Include="Microsoft.CSharp" />
<Reference Include="System.Data" />
<Reference Include="System.Xml" />
</ItemGroup>
<ItemGroup>
<Compile Include="Program.cs" />
<Compile Include="Properties\AssemblyInfo.cs" />
</ItemGroup>
<Import Project="$(MSBuildToolsPath)\Microsoft.CSharp.targets" />
<!-- To modify your build process, add your task inside one of the targets below and uncomment it.
Other similar extension points exist, see Microsoft.Common.targets.
<Target Name="BeforeBuild">
</Target>
<Target Name="AfterBuild">
</Target>
-->
</Project>


